
14 Peaks Mountaineering Institute

Beginners Course En

Course Manual — 2026

Download PDF

This manual introduces new participants to the fundamentals of fixed-rope mountain travel, safety, and professional conduct at 14 Peaks Mountaineering Institute. It is designed as a first, entry-level course for participants who want a solid and safe foundation in fixed-rope travel and for those who may later continue towards professional mountain training.

Chapter 01

Introduction to the Basic Course

Welcome

Welcome to 14 Peaks Mountaineering Institute. This basic course is the first step in your journey with us. You may be joining as a future mountain professional, or you may simply want to develop a safe and reliable foundation in fixed-rope travel. During the course, you will develop habits, judgement, and technical skills that can support your future training and mountain activities.

History of the Idea

14 Peaks Mountaineering Institute was founded on the belief that mountain and rock activities involve real risks and that people who guide others through these environments need structured, rigorous education. The course material brings together technical and bibliographic foundations used in international mountain-guiding education, together with techniques taught through the Institute's own training programmes.

The aim is to give participants a common theoretical foundation, from beginner-level training through to more advanced professional development.

Methodology

Each course is influenced by the conditions in front of the group, including weather, group size, terrain, and participant readiness. For this reason, no two courses are exactly the same. The following principles remain constant:

  • There are no techniques that are suitable for every situation. Participants must understand the minimum safety standards and learn how to adapt their approach to the terrain and conditions.
  • Instructors will demonstrate the minimum standard required for each movement and decision. They may also show their own preferred methods. Ask questions whenever something is unclear.
  • In many situations, more than one method may be demonstrated. The goal is to understand the principles behind a technique rather than memorise only one sequence.
  • Success means that the group completes the activity safely, returns home safely, and has a positive experience. The specific technique must always be appropriate for the situation.

No manual can replace direct instruction and supervised practice in the field.

SAFETY REMINDER

No written manual can replace direct instruction and supervised practice in the field. Participants must follow the instructions of qualified instructors and must not practise technical rope systems independently unless they have been trained and authorised to do so.

Sports Ethics

Every activity in this course is part of a wider code of professional and personal conduct. Participants are expected to:

  • Put safety before ego, speed, or pressure to reach a summit.
  • Represent 14 Peaks Mountaineering Institute and the mountain-guiding profession honestly and professionally.
  • Treat instructors, fellow participants, clients, local communities, and colleagues with respect.
  • Communicate clearly and responsibly, especially when discussing safety and risk.
  • Support an inclusive professional environment and help reduce barriers to participation in mountain activities.
Chapter 02

Basic Equipment for Fixed Ropes

Before learning technical skills, every participant should understand the names and basic purposes of the equipment used during the course. Correct equipment selection, inspection, and use are essential parts of mountain safety.

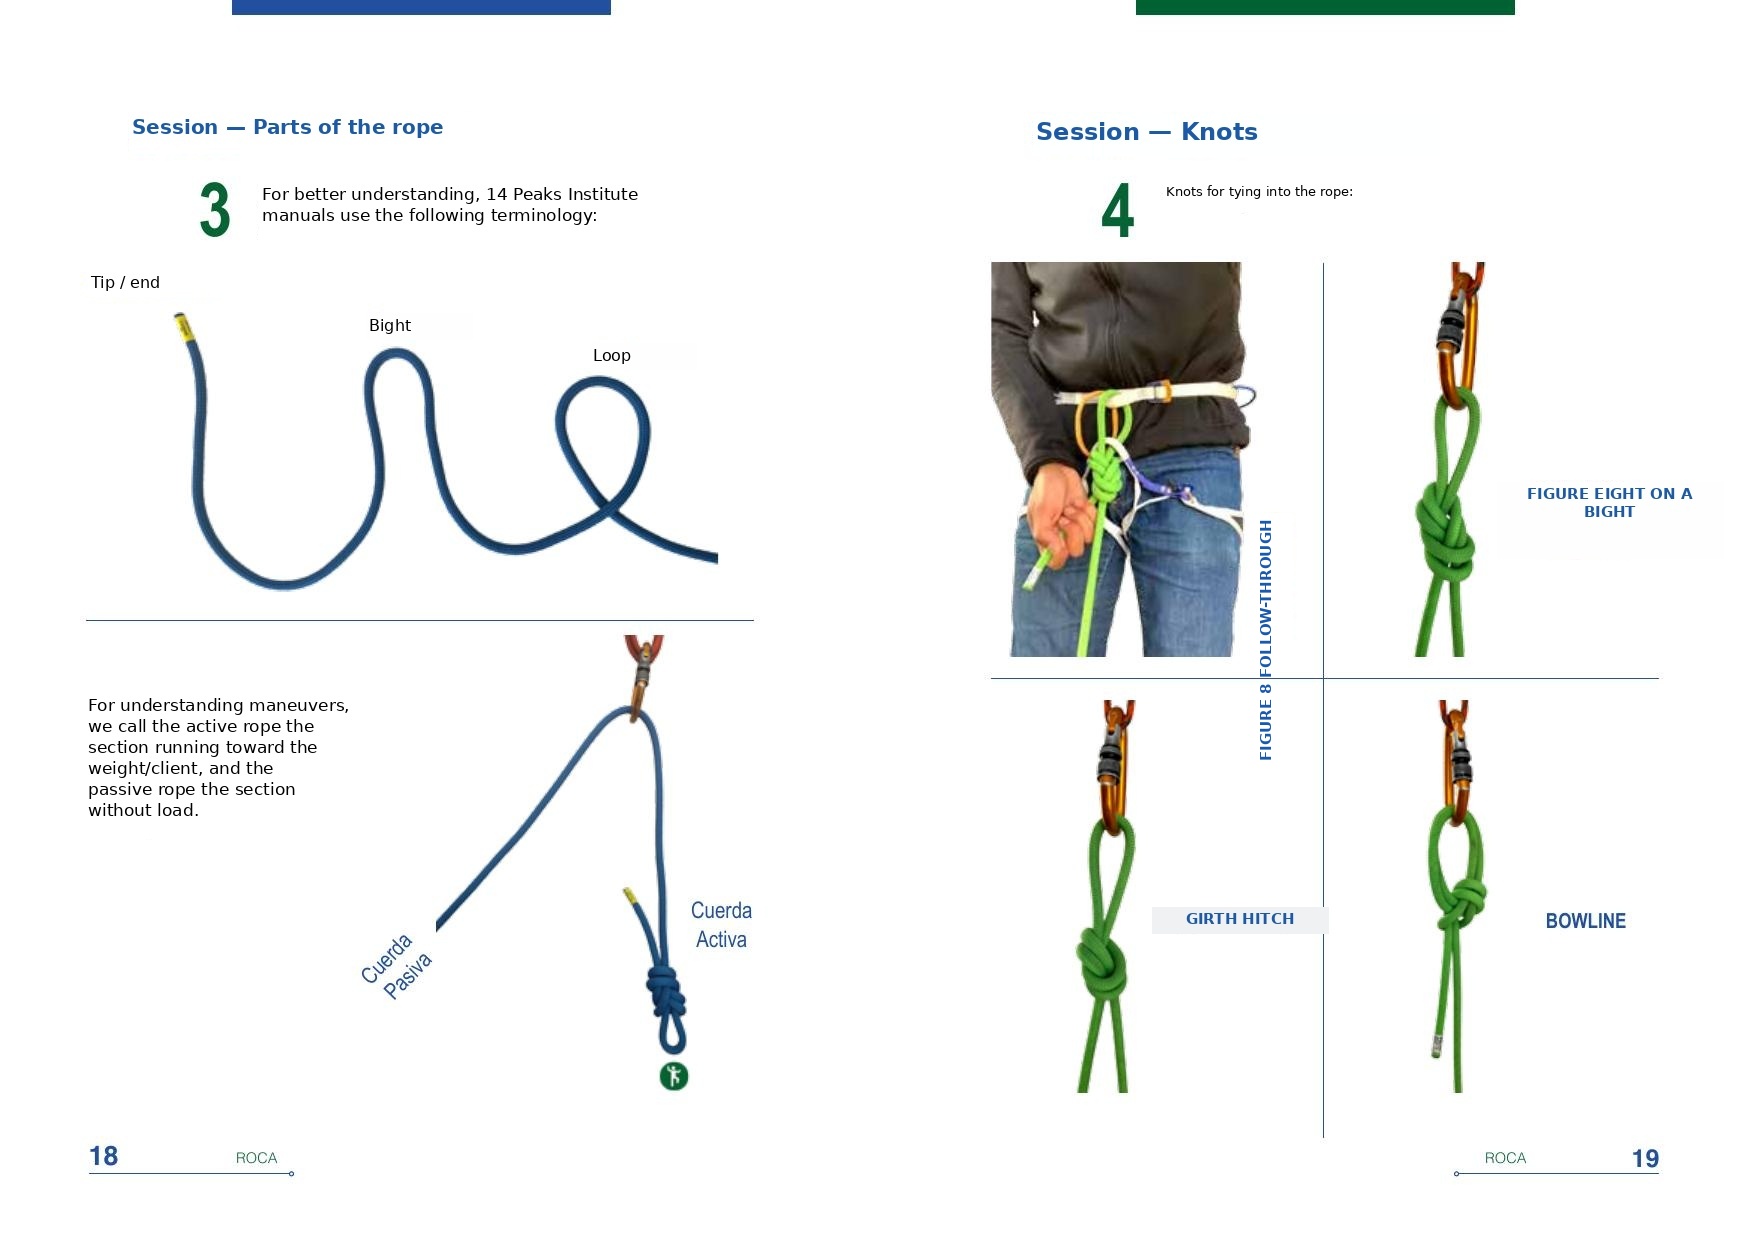
Parts of the Rope

For clarity, this manual uses the following terminology:

  • Rope end (or Tip): the very end of the rope.
  • Bight: a simple curve or bend in the rope.
  • Loop: a section of rope that crosses over itself.
  • Active rope: the section of rope running towards the load or the person being protected.
  • Passive rope: the section of rope that is not carrying the main load.
Basic tie-in knots you will practice with fixed-rope equipment.

Essential Equipment

The essential equipment for fixed-rope work may include:

  • Certified climbing or mountaineering harness.
  • Climbing helmet.
  • Locking and non-locking carabiners.
  • Personal anchor tether or lifeline.
  • Belay/rappel device.
  • Climbing rope or fixed rope, as appropriate to the activity.
  • Helmet-mounted or handheld light source for early starts or low-light conditions.

Learn How to Use the Equipment

  • Harness and helmet: check that they are correctly fitted and secured before starting.
  • Carabiners: understand the difference between locking and non-locking types and when each is appropriate.
  • Personal anchor tether: provides a direct connection to an anchor when appropriate.
  • Belay/rappel device: learn the correct use of the device selected by your instructor before using another type.

Chapter 03

Safety and Risk Prevention

Technical skill is only one part of mountain safety. Participants must also learn how to identify hazards, plan routes, communicate clearly, and prepare for emergencies.

Hazard Identification

Every session begins with a shared understanding of risk. Participants learn to identify objective hazards, such as rockfall and weather, as well as hazards caused by human decisions and errors.

Participants are also introduced to common decision-making traps, including familiarity, social pressure, sunk-cost thinking, and summit pressure. These factors can influence people to continue when a safer decision would be to stop, change the plan, or turn back.

Route Planning

Route planning begins before the activity. It may include digital and map-based navigation, estimating travel time, understanding the terrain, and preparing the documentation required for the activity.

A good route plan should also consider what to do if conditions change or an incident occurs during the route.

Emergency Protocols — The 3×3 Method

The 3×3 method is introduced as a structured approach to risk assessment. It considers three levels of the environment: the wider region, the specific route or slope, and the immediate situation. At each level, participants consider conditions, terrain, and people.

The course also introduces structured incident planning so that emergency actions are prepared in advance rather than improvised after an incident occurs.

  • Morning guides' meeting: review conditions, the plan, the objective, and the alternative plan before departure.
  • Evening guides' meeting: review what went well, what could be improved, and what may need to change the following day.
  • Daily course check-in: practice structured communication at the beginning and end of each course day.

Chapter 04

Equipment Care, Maintenance, and Replacement

Mountaineering equipment can protect lives only when it is correctly selected, inspected, maintained, and retired when necessary.

Inspection and Standardization

  • Learn the correct names of all equipment used during the course.
  • Inspect equipment regularly for wear, damage, deformation, sharp edges, cuts, fraying, or other signs of deterioration.
  • Check helmets for signs of significant impact or damage and follow the manufacturer's retirement guidance.
  • Keep a personal notebook or record of relevant equipment checks, conditions, and decisions when appropriate.

Retiring and Replacing Equipment

Equipment should be removed from service when it is damaged, excessively worn, contaminated, or otherwise no longer considered safe according to the manufacturer's instructions or the organization's equipment policy.

When appropriate, record the reason for retirement before disposal. This can help the organisation track equipment history and identify repeated problems.

Assistance with Purchasing Equipment

New participants are not expected to arrive with a complete personal equipment kit on the first day. 14 Peaks Mountaineering Institute can provide guidance on essential equipment, appropriate certifications, and purchasing priorities. Participants should seek instructor advice before buying specialised equipment.

Chapter 05

Basic Progression Techniques for Fixed Ropes

This section introduces basic movement principles for terrain where a rope is required. The appropriate technique depends on the terrain, the consequences of a fall, the group's ability, and the available protection.

Before Using the Rope

Not every situation requires a rope. Before selecting a technique, consider the terrain, the consequences of a fall, the ability of the group, and the protection available.

  • Walking without a rope: suitable only where the terrain and consequences of a fall allow it.
  • Demonstration without a rope: the instructor demonstrates safe movement while considering the ability of the participant.
  • Pace-setting without a rope: maintain a pace suitable for the whole group.
  • Spotting without a rope: provide appropriate assistance on easy scrambling terrain and use clear verbal communication.

Simultaneous Progression

Basic roped movement on moderate terrain.

Simultaneous progression means that members of the party move at the same time while connected by a rope system. This technique is appropriate only when the terrain, conditions, and participants' abilities make it suitable.

The leader must continuously assess the terrain, the rope system, and the people in the group. If the terrain becomes more difficult or the risk increases, the group must change to a more secure technique.

SAFETY REMINDER

The exact rope-management method must be taught and supervised by a qualified instructor. Do not treat the diagram as a standalone operating procedure.

Chapter 06

Short Rope Technique

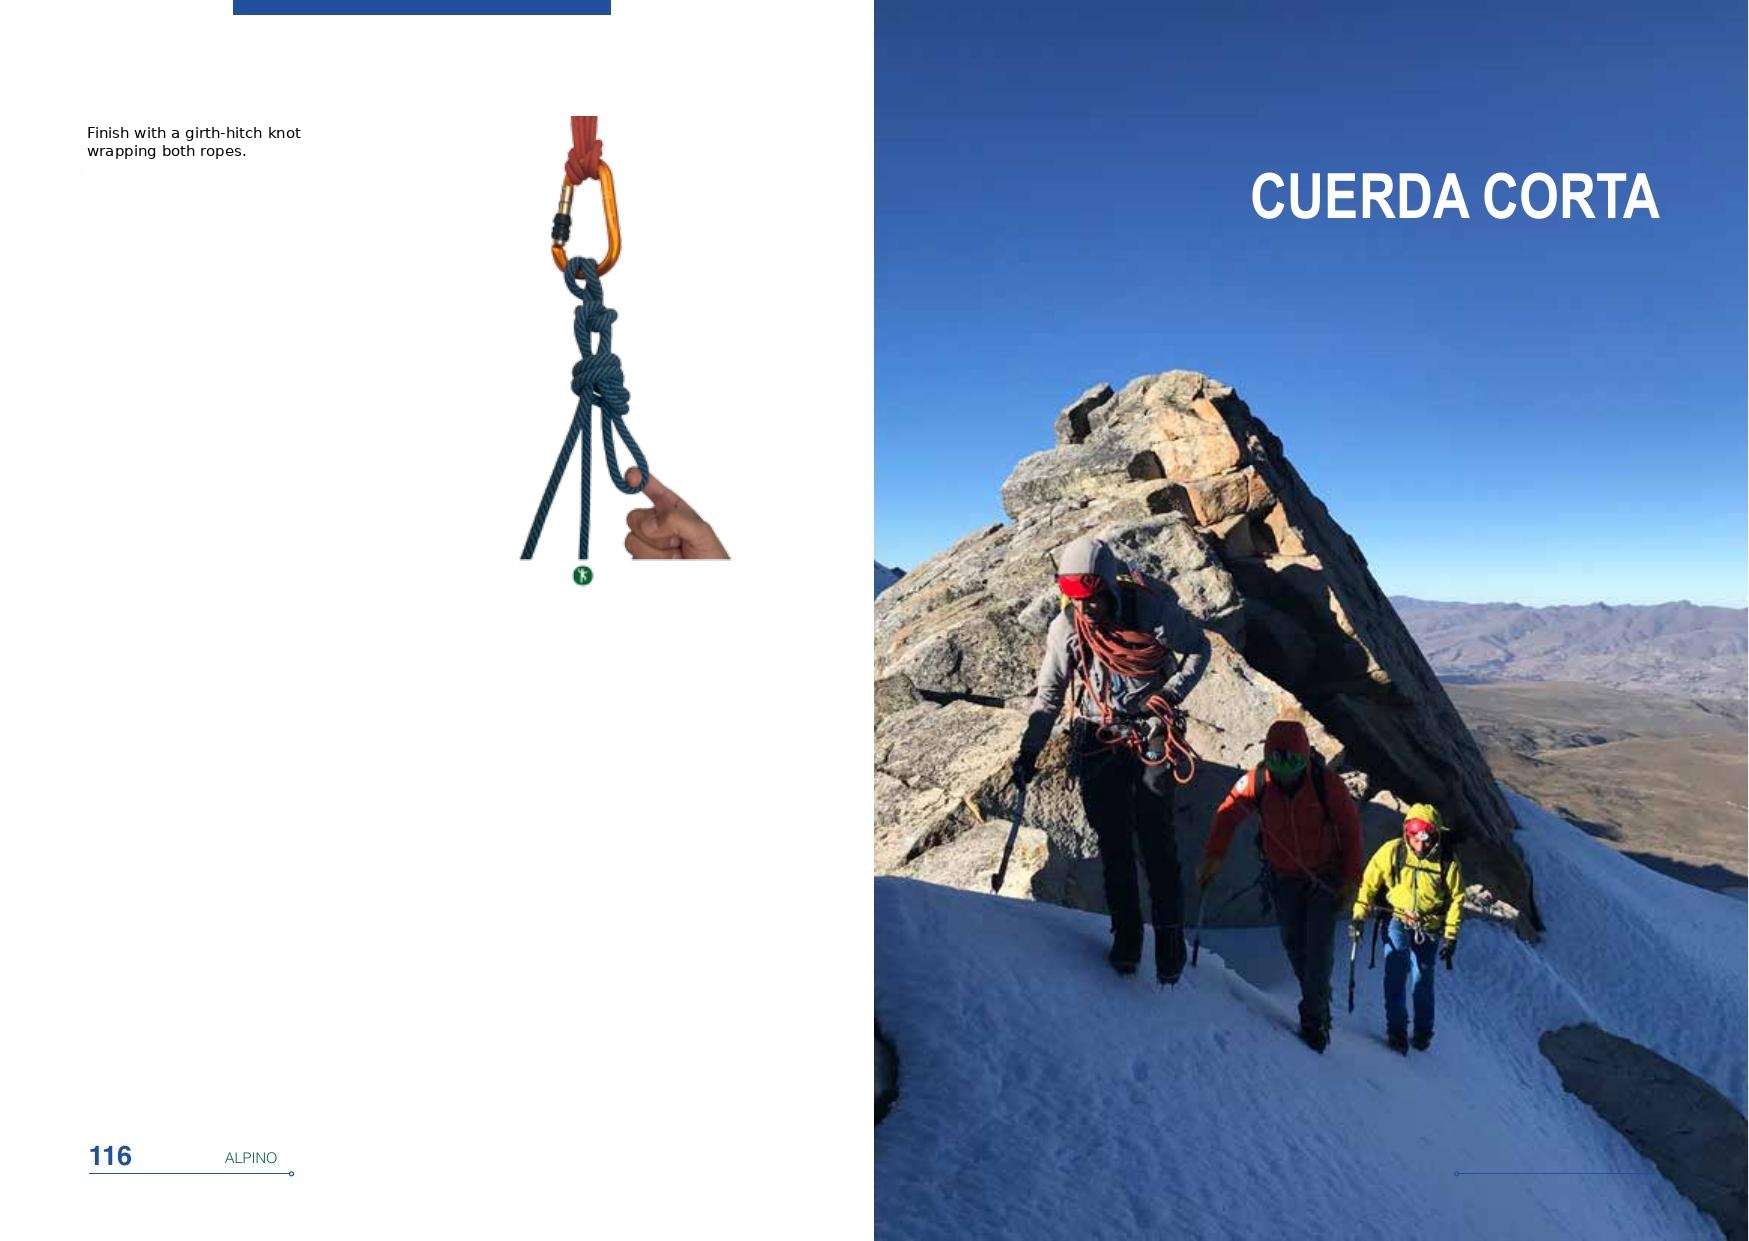
Short-roping.
Short-roping.

Short-roping is a professional technique used by a qualified leader to protect a partner or client on appropriate terrain. It is not a technique for unsupervised practice between beginners.

The suitability of short-roping depends on the terrain, the leader's skill, the physical condition of the people involved, the consequences of a fall, and the ability of the leader to maintain an effective protective position.

The goal is to reduce the likelihood that a loss of balance becomes a fall and to maintain appropriate control of the rope and the people being protected.

Hand Belay

The leader uses the rope and body position to provide additional resistance and protection. The leader should choose a stable position appropriate to the direction of a possible fall.

Shoulder Belay

The leader uses a stable body position and manages the rope around the upper body in the configuration taught by the instructor. The rope path and body position must be checked carefully.

Waist Belay

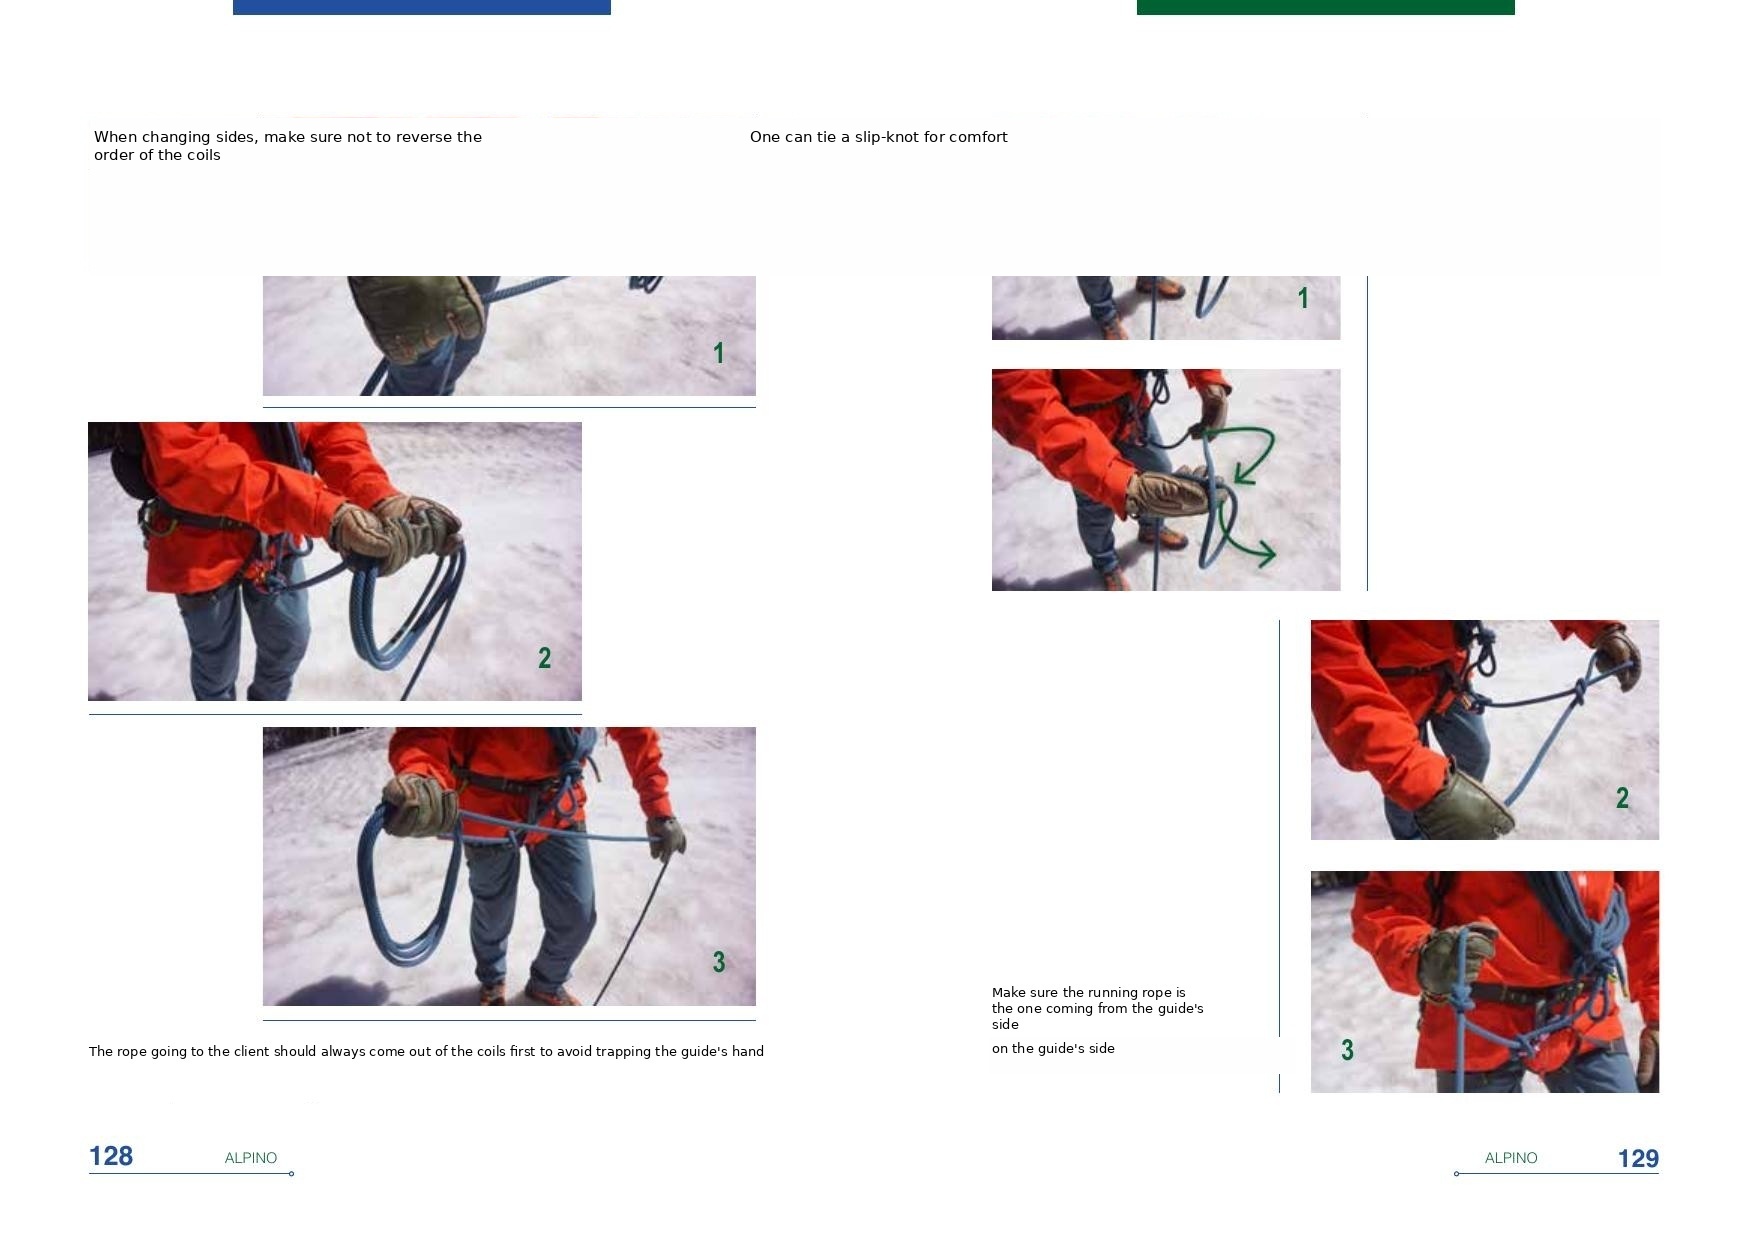
Waist belay position, and a common error to avoid.

The leader adopts a stable position and manages the rope around the body according to the taught system. Where appropriate, the leader may also be connected to a suitable anchor.

Body, Anchor, and Terrain Belay

When the terrain does not provide a comfortable or stable position, the leader may use an appropriate anchor or terrain feature as part of the protection system. The exact system must be selected and demonstrated by a qualified instructor.

Chapter 07

Progression and Rappelling on Fixed Ropes

Descending safely is as important as ascending safely. This module introduces the equipment, checks, and procedures used for movement and rappelling on fixed ropes.

Lowering and Rappelling Options

The appropriate descent method depends on the fixed-rope system and anchor arrangement at the site. Options may include rappelling with an appropriate device or using a lowering system established by a qualified instructor.

Personal Anchor Tether

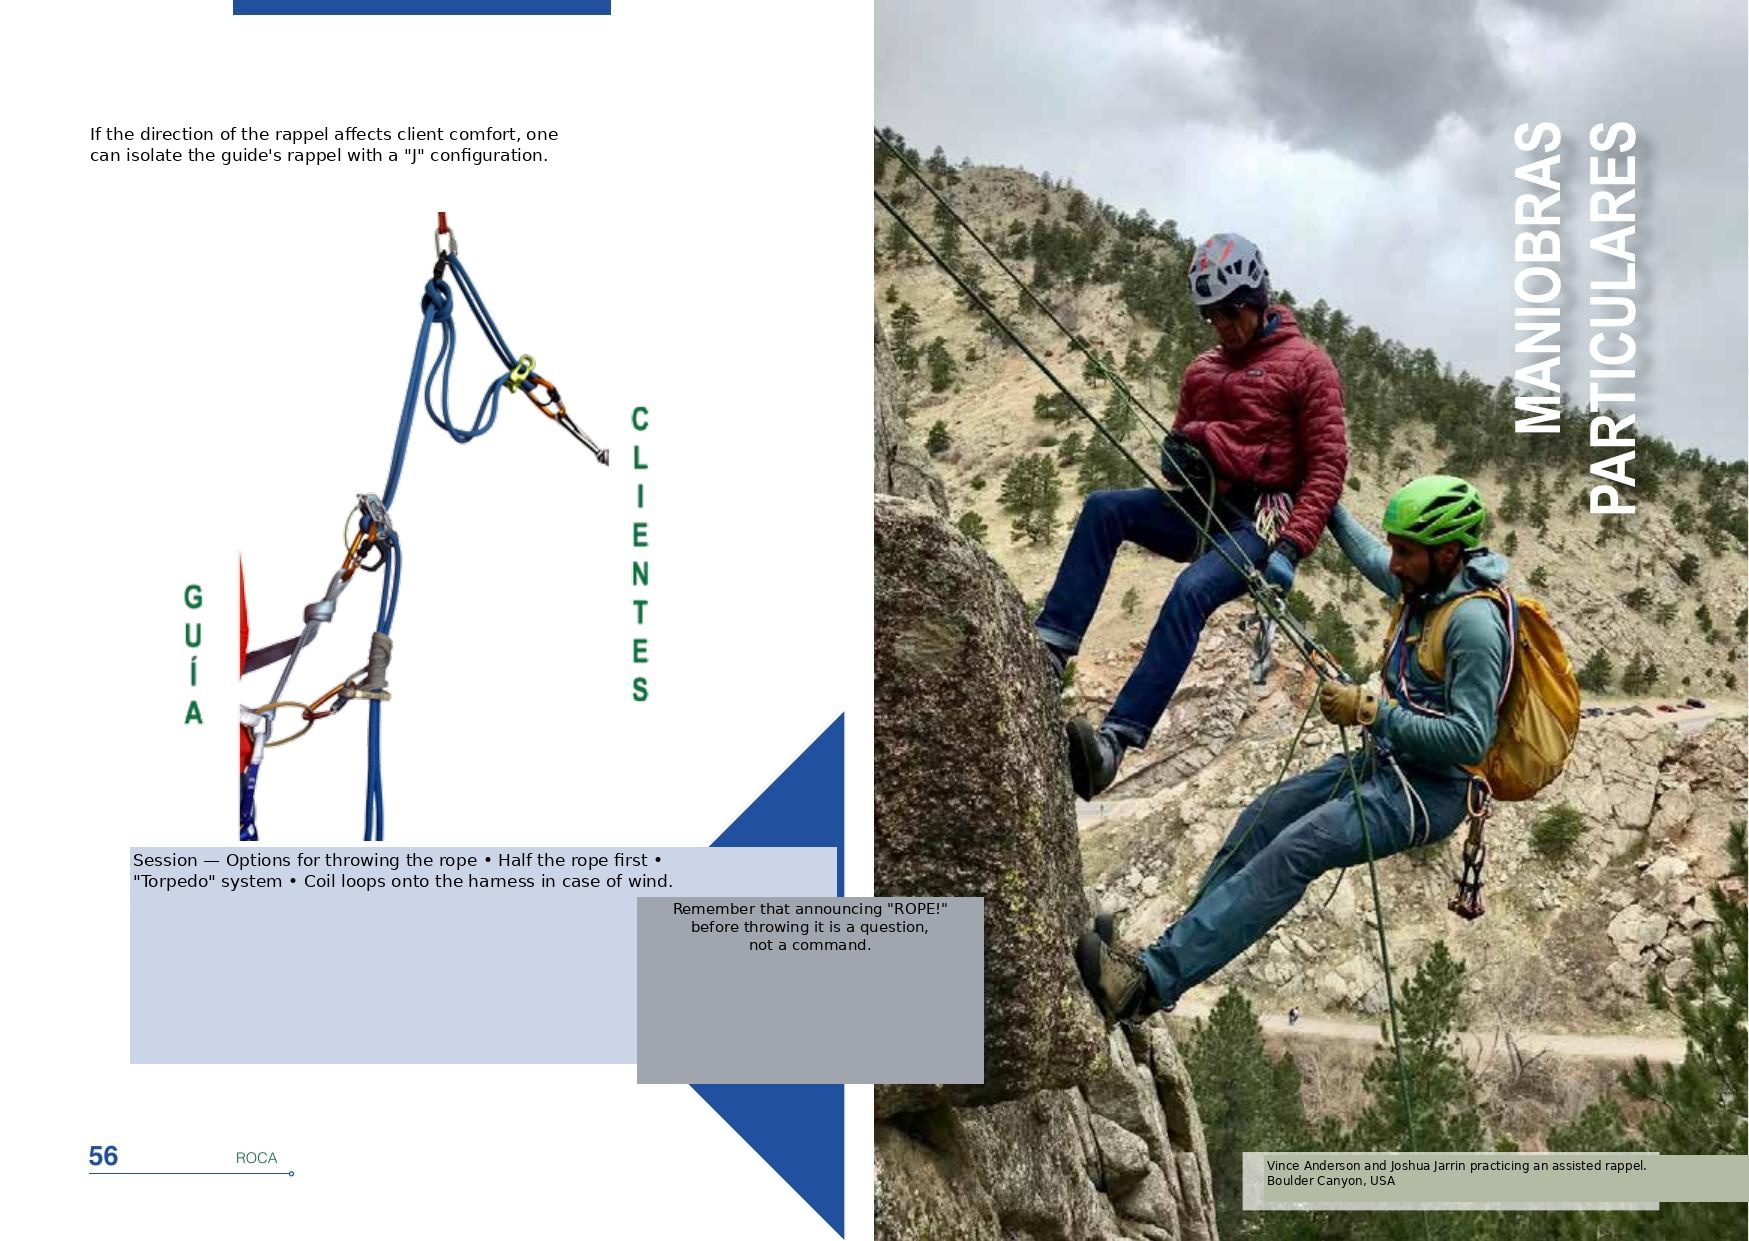
Personal anchor tether options for connecting to a fixed-rope anchor.

A personal anchor tether may be used to maintain a connection to an anchor when appropriate. Participants learn how to select and use the correct configuration under instructor supervision.

Pre-Rigged Rappel

Before starting a rappel, participants must verify the complete system and the surrounding environment. Checks should include the anchor, rope, rappel device, carabiner, personal connection, backup system where applicable, and the descent area.

SAFETY REMINDER

The exact rappel system and backup method must be taught by a qualified instructor. Participants must not rely on a diagram alone when setting up or using a rappel.

Throwing the Rope

When a rope needs to be deployed for a rappel, it must be managed carefully to reduce the risk of tangles and ensure that the rope reaches the intended area. The instructor should demonstrate the appropriate method for the conditions.

Always communicate clearly before throwing or deploying a rope. Confirm that people below are aware of the action and that the area is safe.

Chapter 08

Assisted Rappel

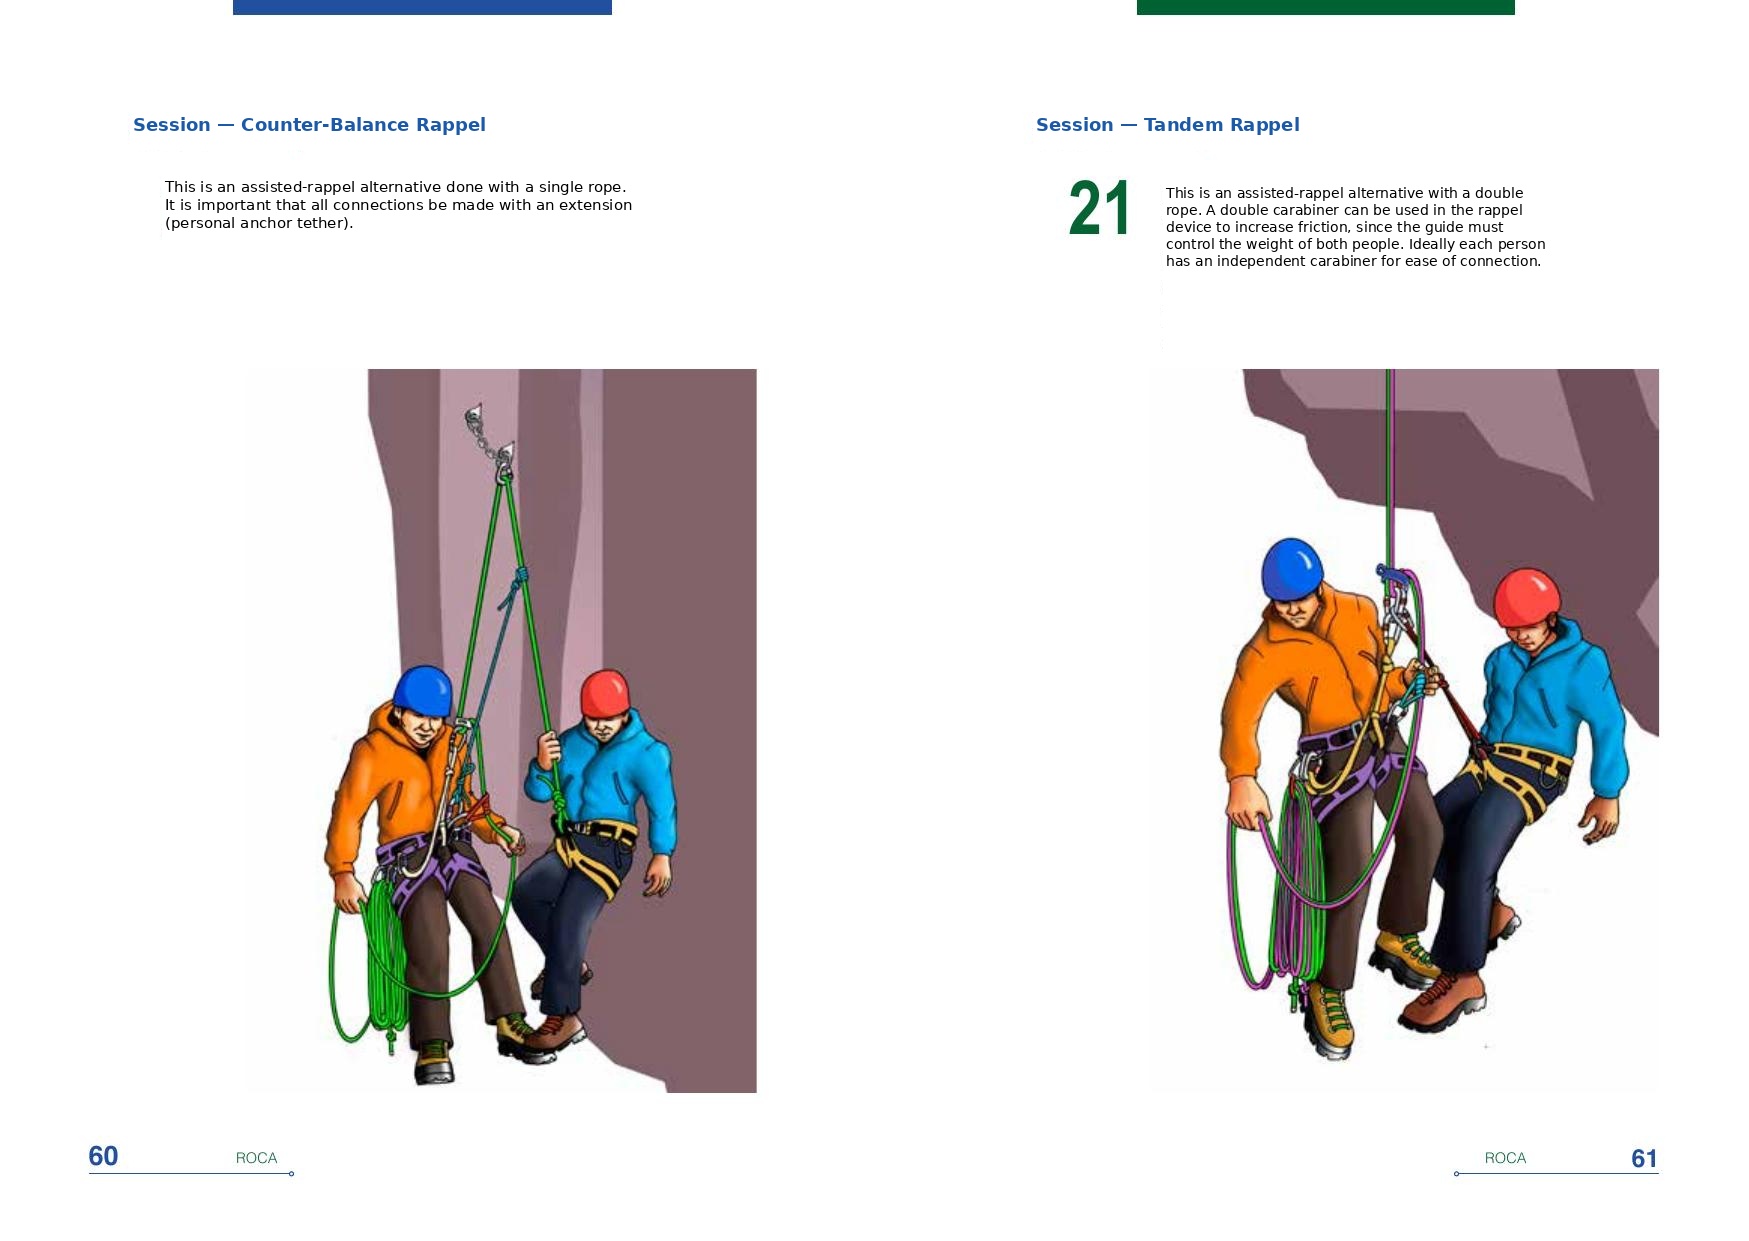
Counter-balance rappel and tandem rappel.

Sometimes a participant may be unable to rappel independently because of inexperience, injury, fear, or difficult terrain. The course introduces assisted-rappel configurations under direct instructor supervision.

Counter-Balance Rappel

A counter-balance rappel involves two people descending together in a system designed to balance their combined weight. Every connection must be correctly established and checked before movement begins.

Tandem Rappel

A tandem rappel involves two people descending together using the rope system and equipment selected by the instructor. The system must provide appropriate control for the combined load.

SAFETY REMINDER

Assisted rappelling involves significant risk. Participants must follow the exact system demonstrated by the qualified instructor and must not improvise connections.

Chapter 09

Crevasse Rescue

Roped travel on a glacier — the first line of defense against a crevasse fall.

Crevasses are major hazards when travelling on glaciers. If a person falls into a crevasse, the rescue response depends on the people available, equipment, rope system, snow conditions, and the stability of the surrounding terrain.

This beginner course introduces the basic concept and sequence. Full technical competence requires dedicated glacier and crevasse-rescue training.

Basic Sequence

  1. Arrest the fall immediately and secure the situation.
  2. Build a suitable anchor.
  3. Transfer the load from the rescuer's body to the anchor in a controlled manner.
  4. Assess the crevasse lip, the condition of the person in the crevasse, and the stability of the surrounding terrain.
  5. Establish an appropriate rescue system using the available equipment and trained personnel.

Pulley Systems — The Concept

If the person cannot climb out independently, a hauling system may be used. The system must include appropriate progress capture and rope management so that the load remains controlled.

The exact pulley system depends on the situation, equipment, number of rescuers, and training level. More rescuers may improve the efficiency of the rescue. A rescue should never be attempted beyond the team's training and equipment capabilities.

SAFETY REMINDER

Crevasse rescue is a high-risk technical skill. This manual introduces the sequence only. Practical training must be conducted by qualified instructors in a controlled environment.

Chapter 10

Special Maneuvers

Mountain situations do not always follow the planned sequence. This module introduces the principles used to manage unusual situations safely. Participants are introduced to the concepts and observe demonstrations of advanced techniques.

Ground Rules for Special Maneuvers

  • Use closed systems and appropriate backups as taught by the instructor.
  • Use an appropriate personal connection when required by the system.
  • Do not rely on a single friction or blocking knot as the only backup for a loaded system.
  • Use appropriate backup systems and check every connection before loading the system.
  • Follow the instructor's system and the equipment manufacturer's instructions.

Assisting a Participant Through a Difficult Move

A participant may sometimes need additional assistance to complete a single move. Depending on the situation, the instructor may use an appropriate assisted movement or hauling system. The system must be selected according to the terrain, the participant's condition, and the available equipment.

Escapes and Passing a Knot

Advanced rope systems may be required when a person needs to be lowered, when a rope system needs to be changed, or when a knot must be safely passed through a system. These techniques should be demonstrated by qualified instructors and practised only under direct instructor supervision.

Chapter 11

First Aid: Gathering Information for the Doctor

This basic course does not certify participants in wilderness medicine. Formal wilderness medical training requires a dedicated course such as Wilderness First Responder (WFR) training or an equivalent programme.

This module focuses on a practical communication skill: gathering and organising important information for a doctor, medical team, or evacuation team after an incident.

What to Gather

A commonly used framework is SAMPLE. Participants may use it to organise important information while waiting for help or preparing to transfer a patient to medical care:

  • Symptoms — what is the person feeling, and where?
  • Allergies — does the person have any known allergies?
  • Medications — what medications does the person normally take, and what has been taken since the incident?
  • Pertinent medical history — are there relevant medical conditions, surgeries, or previous injuries?
  • Last intake — when did the person last eat or drink?
  • Events leading up to the incident — what happened, and in what order?

Also record important observations over time, such as responsiveness, breathing, visible bleeding, and obvious deformity. A clear written or time-stamped record can help the medical team understand how the person's condition has changed.

SAFETY REMINDER

Any treatment beyond the level of your current training and certification must be provided by appropriately trained personnel.

Chapter 12

Respect and Conservation of the Environment

Leave No Trace

14 Peaks Mountaineering Institute operates in mountain environments that are valuable and sensitive. Every participant is expected to understand and apply Leave No Trace principles.

  • Plan ahead and prepare.
  • Travel and camp on durable surfaces.
  • Dispose of waste properly.
  • Leave what you find.
  • Minimise campfire impacts where fires are permitted.
  • Respect wildlife.
  • Be considerate of other visitors and local communities.

Local Regulations

Each region has its own regulations, permits, protected-area rules, and community agreements. Participants must learn and follow the specific rules that apply to the area in which they are travelling.

Where the course operates alongside local or Indigenous communities, participants should approach local people, culture, language, and land with humility and respect.

Chapter 13

Ethical Conduct

Professionalism

14 Peaks Mountaineering Institute expects every participant and future guide to follow high standards of honesty, responsibility, communication, and respect. Participants should be honest about their own abilities, communicate risks clearly, and build relationships based on trust.

Behaviour with Clients

Clients trust guides with their safety and often make a significant personal and financial investment in their experience. Professional behaviour includes setting clear expectations, communicating honestly when plans change, answering questions responsibly, and respecting each client's comfort, dignity, and consent.

Behaviour with Colleagues

The same professional standards apply when working with colleagues. Participants should communicate directly, respect different backgrounds and experiences, support teamwork, and contribute to a safe and inclusive working environment.

Awareness of Cultural and Gender Barriers

Mountain guiding and expedition work bring together people from different cultures, languages, and backgrounds. Participants are expected to approach local communities with humility and respect and to contribute to an inclusive professional environment.

The Institute encourages participants to recognise barriers that may affect access to mountain professions, including gender-related barriers, and to support fair and respectful opportunities for all.

Chapter 14

Course Learning Outcomes

By the end of this course, participants should be able to:

  • Identify and correctly name the main equipment used during the course.
  • Explain the basic parts and terminology of a rope.
  • Understand the purpose of selected basic knots and practise them under supervision.
  • Recognise common mountain hazards and participate in basic risk assessment.
  • Understand the principles of route planning and emergency preparation.
  • Inspect basic equipment and recognise common signs of wear or damage.
  • Understand the principles of movement on fixed ropes.
  • Understand the purpose and limitations of short-rope techniques.
  • Understand the basic principles of rappelling and assisted rappelling.
  • Describe the basic sequence of a crevasse rescue.
  • Understand the importance of professional conduct and clear communication.
  • Apply basic environmental and Leave No Trace principles.

© 2026 14 Peaks Mountaineering Institute. Beginners Course Manual.